Tuesday, October 28, 2014

Sleepytime Bath Blend

This is a super quick and easy detox bath blend for help sleeping, calming, releasing stress, rest & relaxation.

Lavender is an amazing and light therapeutic scent, helping to release the stresses of the day and calm us before bedtime.
The scent of lavender has shown to have positive effects on mood within certain adult populations and can help to alleviate mild feelings of agitation or distress.

Lavender oil is known for its skin healing properties and its use as a sedative.

-Mountain Rose Herbs

Sleepytime Bath Blend DIY

You can also see our Oatmeal Bath Blend for adults or Herbal Baby Bath Blend for children.

What You'll Need:


The easiest way to make this blend is to start it and store it all in the same jar. You can pour all the ingredients in at once or you can do it in layers for easier mixing.

Fill your jar with epsom salts (leaving 1/4 of room at the top)

Add in 2-4 tbsp of Baking Soda

Add in 2-5 tbsp or however much you like, of Lavender buds.

cap the lid and SHAKE, SHAKE, SHAKE!

Drop in 5-10 or so drops of lavender oil, cap and continue to shake!

You can either pour up to 1/2 cup or so straight into the bath OR you can use an Organza Baggie if you don't like the lavender flowers floating around in the tub with you.

Sleepy Time Bath Salts

 Restful Sleeping! ~ <3


What do you do to help you sleep at night? 

I recommend Mountain Rose Herbs & Starwest Botanicals for all of your herbal healing needs! You can purchase any extra supplies over at Amazon.ca. Images Edited using PicMonkey. Some of the links here are affiliate sites. & Please also see my disclaimer. Thanks Friends.

Oatmeal Calendula - Herbal Bath Blend. - DIY

This is an adult variation of the Herbal Baby Bedtime Bath Blend. It's soothing for the mind & body. The main difference is there are more epsom salts added to the adult version. The salts mixed with the baking soda help to detoxify and cleanse the body, while the calendula & oatmeal is healing and  soothing for the skin. Lavender helps calm and relax us, & helps to make us sleepy and eases stress.

Calendula Oatmeal Herbal Bath Blend


What You'll Need:


Tools:


To Make:


I mix mine straight in a big jar but if you prefer a mixing bowl and to funnel contents into jars later, that's okay too. ^_^

  1. 1 Part Epsom Salts to 1 part Oatmeal. This will act as the base for the blend.

  2. 2-4 tsp of baking soda

  3. Depending on your preferences, add in as much or as little as you'd like of Chamomile, Calendula & Lavender Flowers. (I put 2 tbs or so of each to a mason jar)

  4. Add in 5-10 drops of lavender oil & shake, shake, shake all of the ingredients together until evenly combined.

  5. Keep stored in an airtight jar.


To Use:


Scoop some into an organza bag and toss the whole thing into the tub! The reason I like to use organza bags for this blend is because the oatmeal makes the tub very slippery. *So be careful!*

Enjoy!


oatmeal calendula bath blend

Happy Bathing! ~ <3


I recommend Mountain Rose Herbs & Starwest Botanicals for all of your herbal healing needs! You can purchase any extra supplies over at Amazon.ca. Images Edited using PicMonkey. Some of the links here are affiliate sites. & Please also see my disclaimer. Thanks Friends.

DIY Solid Exfoliating Bars.

This bar has many nourishing ingredients in it, used to exfoliate and moisturize your skin. These bars are great for everyday exfoliating as well as healing stretch marks, cellulite & providing moisture to your skin. 

The caffeine in coffee helps to stimulate blood circulation to the affected area so the healing process can begin. Honey is also known for helping to reduce stretch marks and cellulite by removing toxins from the affected areas. Calendula & Coconut oil are amazing at healing nearly anything & they work as intense moisturizers as well.

We talked a bit about the benefits of coffee for our skin over in the post: Exfoliating Coffee Cubes - For Stretch Marks & Cellulite. 

This recipe is completely customizable to suit your preference but I've outlined the basic recipe that I like to use.

Solid Exfoliating Bars - DIY


What You'll Need:


Tools:

  • Mixing Bowl & Spoon

  • Silicone Molds of choice. (I used THESE round ones and THESE square ones) (The circles may be a bit more of a gentle shape for your skin - also easier to hold)

  • Airtight jar for storage


To Make:


Put all of your ingredients in a large mixing bowl and stir until everything is combined evenly.

I added a bit more sugar to my mix so it wasn't quite as sloppy as the top stage. It'll definitely take much longer to cure this way.

You want to make sure the consistence of the mixture is a little on the damp side. This will evaporate as we let them cure and turn them solid. I've put together some photos of what the stages should look like below.

Scoop into your molds and press down firmly so there are no air bubbles.

How to make your own exfoliating bars


Here comes the part where patience comes into play. Much like allowing soap to cure, these bars will take a while to completely solidify. They should then be stored in an airtight jar or container.

*Some people suggested putting them in the oven on the lowest setting for a few hours to dry them out faster. ( I was trying to rush things for the craft sale at the beginning of the month) I tried this and it just turned out to be a massive mess. The mixture boiled over and started melting itself to the bottom of the oven. I definitely don't recommend doing it this way. I think patience is key here.

Allow them to dry completely somewhere safe, dry and clean like you would soap. No where that has any humidity. It'll take a few weeks for them to solidify completely.

Once they look the the end photo above, you can stretch the mold from side to side like you would an ice cube tray and gently push them up out of the mold without them breaking.

I allowed mine to sit out between brown paper for a few more days. They are now rock solid.

To Use:


Bring the bar into the bath or shower with you. Gently massage in circular motions.

The bars stay solid and gradually break down while you use them. They stay together very well and work wonderfully for exfoliating.

You will have bits of oatmeal and coffee floating around with you + the oils so just be careful as it could make the tub slippery. 

Happy Exfoliating! ~ <3


Solid Exfoliating Bars - DIY all natural


I recommend Mountain Rose Herbs & Starwest Botanicals for all of your herbal healing needs! You can purchase any extra supplies over at Amazon.ca. Images Edited using PicMonkey. Some of the links here are affiliate sites. & Please also see my disclaimer. Thanks Friends.

Other posts you might like: 

Calendula Healing Salve

50+ Uses for Coconut Oil 

Monday, October 27, 2014

<script type="text/javascript" src="http://www.avantlink.com/affiliate_app_confirm.php?mode=js&authResponse=749af8fb766aac8464e7f69da6fb7b865779578b"></script>

Sunday, October 26, 2014

Grounding Footwear for Earthing.

I'd like to take a moment to talk about an amazing company! - Juil - EARTHING SHOES of all styles and fashions! Even Element collections! The product list is amazing and they certainly have something for everyone!


SO much love to this amazing company!


juil-new-sandals-300x250

Their shoes are designed to keep us grounded and connected to the earth. How amazing is that!?

A way to go barefoot, without going barefoot! ;) 

Basically, Earthing is maintaining a direct connection to the surface of the Earth, which is very beneficial to our health. Juil's shoes help to keep this connection by using copper “dots”.
They act as a conduit between your body and the earth, allowing you to stay truly connected and balanced.

Juil sandals and shoes cleanse your body of stress and toxins in the form of free radicals. The benefit is simple, you feel better.

If you're interested in learning more about Earthing be sure to check out Juil's FAQ Page


Research indicates that maintaining a direct connection between your feet and Earth's surface, may be beneficial to your health. When you're barefoot, your body is able to absorb Earth's limitless supply of free electrons. These electrons serve the function of antioxidants by stabilizing rampant, unhealthy free radicals in your body. As a result, you help decrease your body's chances of growing inflammation, degenerative diseases and other health ailments. Moreover, you feel good. - Why Our Ancestors Had It Right By Going Barefoot - Mind Body Green. 


They are even offering a FREE chakra roll on with every purchase right now! Grab this deal while it lasts! <3 
Back By Popular Demand! Our gift with purchase from Aura Cacia Aromatherapy is here again! We're throwing in a Chakra Balancing Essential Oil Roll-On with every pair purchased!

BA_Fall_9.1_NewArrivals_728x90


SHOP JUIL 


Juil Earthing Shoes

Juil - Earthing Shoes - Connect With the Earth


 Happy Earthing! ~ <3


This post contains Affiliate links for Juil -

Meaning, if you purchase something from my links I earn a small commission. <-- Thank You! 

DIY Whipped Coconut Oil Body Butter.

Coconut Oil is so amazing for our skin, one problem is, it's a little difficult to scrape out of the jar. Well, here is a simple solution so you can enjoy the nourishing benefits of coconut oil - anytime.

This recipe can be customized to fit any preference. Essential oils can be added for different scent options, & other nourishing oils and butters can be added as well. Some amazing options would be Vitamin E OilShea Butter or Cocoa Butter.

This is a pretty basic recipe with only 3 ingredients!

How to make your own Whipped Coconut Oil Body Butter


What You'll Need:


 I added 1/2 cup of coconut oil, 1 tbs of calendula infused oil and 4 drops of coconut scent. 

Tools You'll Need:


  • Mixing Bowl

  • Hand Mixer (Or better yet, a stand mixer) 

  • Spoon

  • Airtight container of choice


To Make: 


How to make your own coconut oil body butter


1. Scoop your coconut oil into your mixing bowl and add in any extra ingredients. (I added calendula infused oil & essential oils) 

--- I did this straight from the jar. While the coconut oil was solid, I think it would have turned out fluffier if I had of refrigerated it first. Some people like to melt everything together first, refrigerate it overnight and then mix it in the morning. (I'll definitely try this next time) 

2. Turn your mixer on high and beat for about 5 minutes, or until everything is as fluffy as you'd like it. 

--- You may have to scoop it all to one side to get it all evenly if you aren't making a big batch. 

3. Once you're happy with the consistency, carefully scoop it into your jar(s). 

VOILA! ~ Simple yet amazing body butter!

<3

If the done butter gets too warm it will melt back into an oil state BUT if it's kept too cold, it may become a little hard. It's best to keep it somewhere cool and not in direct sunlight. 


This was my very first attempt at a body butter. I don't think it turned out too bad. It definitely could have been worse. ^_^ I just wish it were a little fluffier, so that's something I will work on next time around.

Here are some pinnable images - I would love for you to share! <3

DIY Whipped Coconut Oil Body Butter 3a

Whipped Coconut Oil Body Butter - How To


DIY Whipped Coconut Oil Body Butter


Happy Creating! ~ <3


Have you made your own all natural body butter before? 

What are your favorite body butter ingredients or scent options? 

I recommend Mountain Rose Herbs & Starwest Botanicals for all of your herbal healing needs! You can purchase any extra supplies over at Amazon.ca. Images Edited using PicMonkey. Some of the links here are affiliate sites. & Please also see my disclaimer. Thanks Friends.


 Now Available On My Etsy! 

Whipped Body Butter Whipped Body Butter Etsy


Saturday, October 25, 2014

10 Fantastic Fall / Halloween Craft Ideas!

I have seen SO many Amazing & Creative DIY Fall Craft Ideas circulating the web & I wanted to do a bit of a collection here to share them with you.  


DIY Fall and Halloween Crafts

Witch's Apothecary Potion Bottles


By - Magia Mia


[UNSET]


DIY Leaf Mason Jars.


By- PLAN PROVISION


9189e28909b4cbb9404a058e98e99114


DIY Halloween Severed Head


By - Crafts Unleashed


DIY-halloween-head-crafts-unleashed-1024x682


CINNAMON PUMPKIN CANDLES


By - Hello Natural 


IMG_6207


Enchanting Halloween Lanterns


By - Adventure in a Box


Enchanting-Halloween-Lanterns-Header


DIY Floating Ghost


By - DIY Louisville


diy-floating-ghost-5_thumb[2]


DIY Halloween Books


By - Better After 


altered_books_for_halloween


Pet Ghost in a Jar


By- Penny Wise


P1060205


Haunted Tree


By- Behind The Studio


226efbc62dc76ba93ab90927f35f0f7ee98f80ac_600


Sparkle Web Decor 


By- Redbook 


glittery-webs


And here's a couple of our own - in case you missed them.


DIY Jack-O-Lantern Jars


DIY Jack-O-Lantern Jars

DIY – Book Of Shadows -


DIY BOS


Happy Crafting! ~ <3


10 Fantastic & All Natural Fall Inspired Beauty Recipes.


10 Fantastic Fall Recipes.

DIY - Book Of Shadows -

My son and I created this antique looking Book Of Shadows quite a few years ago and I thought since it's spooky season, why not share the easy DIY here with you! <3

DIY BOS

What You'll Need:


  • Old Book or Binder ( We made this one out of a binder)

  • Paper Towel, Cheesecloth, Toilet Paper, etc.

  • White Glue or Modge Podge

  • Foam brush or paint brush

  • Glue Gun / Cardboard / Print Outs or Halloween things to stick to the book.

  • Acrylic Paints ( We used black as a base and dry brushed golds and browns into the top)

  • Matte Clear Coat Spray (Or a final layer of Modge Podge)

  • Tea or coffee (if you are staining pages to look old)

  • Newspaper or something to cover your workspace.


To Make: 


Choose your book and start with thin strips of paper towel (or whatever you chose to use) I like the paper towel the best because it's strong enough not to tear but wrinkles up easily to look like old worn leather.

Paint a small patch of glue on your book and lay the paper towel over it, then paint glue again over the paper towel. Continue this until your book is entirely covered. - You may have to do one side at a time and allow to dry in between or you may end up with a sticky mess. (You could try opening the binder and laying it flat but we also wrapped the paper towel cover into the inside of the book right up until the binder rings. Also- If you let it harden this way, you'll have a hard time closing it later. It's probably best to do one side at a time.)

You can add extra wrinkles, cardboard shapes, paper towel shapes, glue gun shapes, you could even stick little rubber halloween decorations to the book and then do a light coat of the paper towel and glue mixture over top. - The pentagram on ours was made from rolled up paper towel but I think a glue gun may make a more precise shape. The title cut out at the bottom is cardboard and a printout. The side of the binder we put cardboard rectangles along it to give it more definition.  Originally we had some really neat rustic looking ornate corners on the front, which were from the scrapbooking section at the dollar store but they fell off somewhere along the way.

Once the entire book has dried, you can paint it however you like. We did a base coat of black and then using a dry brush, dipped into golds and browns, wiped extra paint off onto a paper towel and then the lightly over the top bumps and embellishments on the book.

Once you're happy with the paint and it's finished drying, you can clear coat it with a matte spray or an extra coat of glue or modge podge.

If you are adding your own pages and want them to look old and spooky you can stain them with tea bags or coffee. Make a STRONG mixture in a heatproof bowl & dab the pages with tea bags. Lay them out to dry.

Finally, You can add feathers, twine, ribbons, page tags, or any such things your creative mind can think of.

We added some pockets on the inside as well for extra bits of paper etc. To do this, lay a few sheets of paper towel onto a cellophane wrapped cookie tray (so it doesn't stick) and paint with glue like you did the book. leave the sides flatter than the middle so it's easier to glue on later. Once it's dry, paint it the same as you did the book and glue along the bottom and sides leaving the top unglued. (I'll try to add a few photos of the making of)


Everyone who has seen the book sitting on our shelf says: "Oh, wow! that book must be really old!"

I love how it turned out and it's extra special because it was a project my son and I made together. We have had this book around for about 6 years and it's still as great looking as day 1, everything has held us really well.
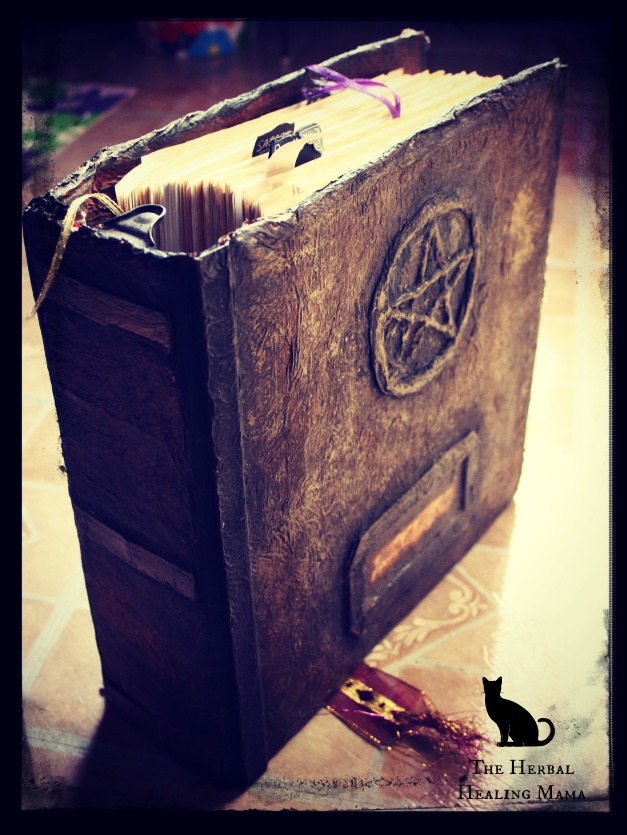
DIY Book Of Shadows


BOS DIY

DIY Witches Book BOS


HAPPY CRAFTING!! ~ <3


You can purchase any extra supplies over at Amazon.ca. (Affiliate link) 

10 Fantastic & All Natural Fall Inspired Beauty Recipes.

I have seen SO many amazing DIY Beauty Recipes circulating the web & I wanted to do a bit of a collection here to share them with you.  

Fall inspired diy beauty recipes

10-Minute Gift Idea: DIY Pumpkin Spice Soap


By- Happiness is Homemade


DIY-Pumpkin-Spice-Soap


Homemade Pumpkin Body Scrub


By - The Penny Wise Mama


Pumpkin2.jpg-646x1024


Pumpkin Pie Homemade Lip Balm + Edible Lip Scrub
By - Hello Natural


feat6


Pumpkin Pie Spice Body Butter


By - This Roller Coaster Called Life 


Pumpkin-Pie-Spice-Body-Butter-e1411572412448


Homemade Fall Face Mask with Pumpkin


By - Alyssa & Carla


fall-face-mask


PUMPKIN COCONUT MILK SALT BARS


By - Lovin Soap


Pumpkin Salt Bar Soap DIY all natural


DIY Pumpkin Scented Massage Candle with Printable Labels


By - Rebecca’s Soap Delicatessen


Pumpkin Massage Candle DIY


DIY pumpkin lotion


By - Scratch Mommy


DIYPumpkinLotion


Pumpkin Foot Scrub


By - Budget 101


pumpkinscrub


DIY Halloween Pumpkin Bath Bomb Recipe


By - Rebecca’s Soap Delicatessen


SONY DSC


And here are a few of our own - in case you missed them.


Pumpkin Spice Lotion Bars, Bath Salts & Sugar Scrub!


Pumpkin Spice Lotion Bars - The Herbal Healing Mama

Pumpkin Spice Sugar Scrub


Pumpkin Spice Bath Blend


10 Fantastic Fall Recipes. ~ Sweet Treats!


10 Fantastic Fall / Halloween Craft Ideas!

DIY All Natural Body Mist.

An all natural alternative to store-bought perfumes. This was one of the reasons I began my natural journey. Both my son and I have severe reactions to anything from (store-bought) deodorant, to laundry detergent. I've never been able to wear commercial perfumes and now that I know what kind of chemicals are in some of them, I'm happier making an all natural body mist at home. I have some permanent scars I am trying to mend from the hives I would break out with. It aged my chest horribly where I would spray it. It caused a lot of long-term and possibly permanent damage. Luckily I have learned about things like Calendula and it's been helping me heal.

Another alternative I have posted is DIY all natural Solid Perfume.

DIY All Natural Body Mist. - An all natural alternative to store-bought perfumes.


What You'll Need:


  • Distilled Water

  • 10-20 drops of your favorite essential oil blend (depending on container size.) I used 10 drops Coconut, 5 drops Nag Champa, and 5 drops Vanilla. It smells amazing! - You can find a huge list of amazing essential oils at Mountain Rose Herbs or Starwest Botanicals

  • Spray Bottle


To Make: 

Fill your spray bottle with distilled water & add in your desired amount of essential oils. SHAKE SHAKE SHAKE!

We all know oil and water don't mix, BUT I've never had any issues with this blend and have been using it for quite some time. Just be sure to shake it everytime you're going to use it. 


Enjoy! ~ <3

I recommend Mountain Rose Herbs & Starwest Botanicals for all of your herbal healing needs! You can purchase any extra supplies over at Amazon.ca. Images Edited using PicMonkey. Some of the links here are affiliate sites. & Please also see my disclaimer. Thanks Friends.